
There’s a specific kind of frustration that comes from spending two hundred dollars on a soundbar, getting it home, plugging something in, and hearing absolutely nothing come out of it. Or worse — hearing sound come from both the TV speakers and the soundbar simultaneously, which somehow sounds worse than just the TV alone. I’ve been there. Most people have been there. And the annoying part is that the fix is almost never complicated once you understand what’s actually going on between these two devices.
The confusion usually starts with the cables.
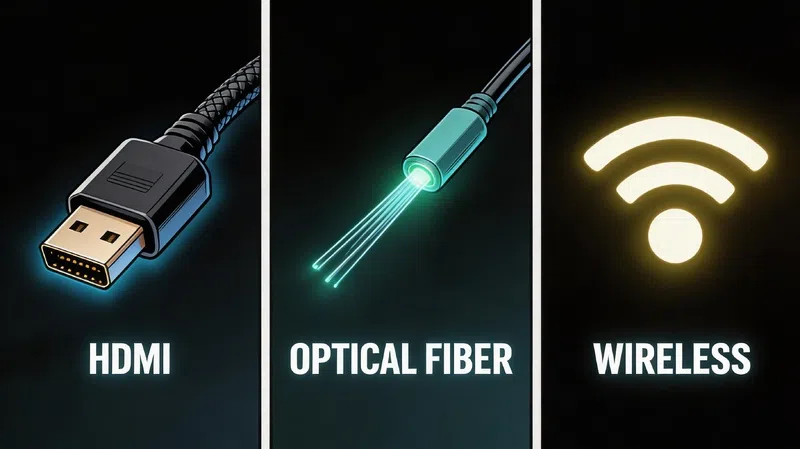
The Three Ways to Connect a Soundbar
HDMI ARC — Start Here First
If your TV was made after 2010 and your soundbar was made in the last five years, there’s a very high probability both support HDMI ARC. This stands for Audio Return Channel, and it’s genuinely the best option for most people — not because it sounds dramatically better in every situation, but because it makes everything else simpler. One cable. Volume controlled by one remote. The TV and soundbar essentially talk to each other.
Look at the back of your TV. You’re looking for an HDMI port labeled “ARC” — sometimes it just says “ARC” in small text below one specific port, and the other HDMI ports won’t have that label. That’s the only one that matters here. On the soundbar side, there’s usually a port labeled “HDMI OUT” or “HDMI ARC.” Connect a cable between those two specific ports, and you’re most of the way there.
The newer version — eARC — is worth understanding if you care about high-resolution audio formats. Regular ARC handles standard audio fine. eARC handles Dolby Atmos and DTS-HD Master Audio in their full uncompressed form, but to actually use it you need both devices to support eARC and an HDMI 2.1 cable. If your soundbar doesn’t support Atmos, honestly, ARC is perfectly fine and there’s no practical reason to chase eARC specifically.
Digital Optical — The Reliable Fallback
Older TV, older soundbar, or just no ARC port available — optical is the answer. The connector is slightly hexagonal with a small plastic dust cap that most people forget to remove, which is genuinely one of the most common reasons optical connections appear not to work. Pull off both caps, connect the cable, and you’ll get a clean digital signal.
The honest limitation of optical is that it tops out at 5.1 compressed audio. If someone is selling you on the idea that optical sounds just as good as HDMI for high-end setups, that’s not accurate — but for the majority of people watching regular television in a normal living room, the practical difference isn’t dramatic. It works, it’s stable, and it doesn’t introduce the occasional handshake issues that HDMI connections sometimes do.
Bluetooth — Convenient but Compromised
I don’t want to be too negative about Bluetooth because it genuinely solves a real problem for people who hate cables. But it’s worth being clear-eyed: Bluetooth audio has more latency than a physical connection, which means fast-moving content — sports, action films, anything with sharp sound effects — will sometimes have a slight but noticeable delay between what you see and what you hear. The connection can also drop or stutter when other wireless devices are competing for signal in the same room.
If the TV and soundbar are close together and you have access to a cable, use the cable. If managing wires is genuinely not possible for your setup, Bluetooth works. Just go in expecting to spend a few minutes in the sync settings afterward.
The Settings Nobody Tells You About
Getting the physical cable in the right port is step one. The part that actually trips most people up is the software side.
After connecting, go into your TV’s audio settings and look for the output device option. It’s usually labeled something like “Audio Output,” “Speaker Settings,” or “Sound Output.” Switch this from “TV Speakers” or “Internal Speakers” to “External Speakers” or “HDMI ARC” depending on your connection type. If you skip this step — and a lot of people do — the TV will keep sending audio to its own speakers regardless of what you’ve plugged in.
PCM vs. Bitstream — A Genuinely Confusing Setting
At some point, you’ll probably encounter a setting asking whether you want your TV’s audio output in PCM or Bitstream format. This one confuses people and the explanations online tend to either oversimplify or go way too deep.
PCM means the TV decodes the audio itself and sends a clean digital stream to the soundbar. It’s compatible with basically everything and rarely causes problems. If you’re not sure which to pick, PCM is the safer default.
Bitstream means the TV passes the raw encoded audio data directly to the soundbar, letting the soundbar decode it. This is what you want if you have a high-end soundbar that supports Dolby Atmos or DTS-HD — letting it do the decoding preserves the full detail of those formats. But if your soundbar’s processor doesn’t handle a particular format well, Bitstream can sometimes cause dropouts or silence.
When in doubt, start with PCM. Switch to Bitstream only if you specifically want Atmos and your soundbar supports it.
The HDMI-CEC Situation
One thing worth knowing: the feature that lets your TV remote control your soundbar’s volume is called HDMI-CEC, but every manufacturer decided to give it a different name. If you’re digging through settings trying to find it, here’s a reference:
| TV Brand | What They Call HDMI-CEC |
|---|---|
| Samsung | Anynet+ |
| LG | SIMPLINK |
| Sony | BRAVIA Sync |
| Philips | EasyLink |
| Panasonic | VIERA Link / HDAVI Control |
| Sharp | AQUOS Link |
| Toshiba | CE-Link / Regza Link |
Find that setting, make sure it’s enabled on both the TV and the soundbar, and unified remote control should work automatically. If it doesn’t, power cycling both devices usually resolves it. RTINGs detailed soundbar setup guide covers this in more depth if you need model-specific advice.
When Something Goes Wrong
No Sound At All
Start with the physical stuff before touching any settings. Is the cable fully seated? Optical connectors in particular don’t always click in firmly and can sit just loose enough to fail. Both plastic caps removed? Happens more than people admit.
If the hardware looks right, power cycle both devices — completely unplug them, wait thirty seconds, plug back in and power on the TV first, then the soundbar. This clears a surprising number of handshake failures between devices. Then go back into the TV audio settings and confirm the output is set to external speakers. Check that HDMI-CEC is enabled. Check that the soundbar is set to the right input source — if it’s set to “Optical” and you connected via HDMI, it will sit silently regardless of what you do on the TV side.
Firmware updates occasionally fix persistent no-sound issues caused by compatibility gaps between devices, so that’s worth checking too if nothing else resolves it. Samsung’s official support documentation has a solid walkthrough for their specific implementation.
Audio and Video Out of Sync
This one is genuinely annoying because it can vary by content — fine for one show, noticeably off for another. Most TVs have a manual A/V sync delay setting buried in the audio menu, usually adjustable in milliseconds, and a small tweak there often solves it entirely.
If the delay is inconsistent, try switching the audio format from Bitstream to PCM — this reduces the processing steps involved and frequently stabilizes sync. There’s also usually a “Pass-through” setting that can be set to Auto, which helps timing on some setups. For gaming specifically, enabling Game Mode on the TV reduces input lag across the board. Rtings AV sync guide explains how these settings interact in more detail.
Sound Coming From Both TV and Soundbar
Navigate to the TV’s audio output settings and confirm it’s set to “External Speakers” only — not “Both” or “Internal Speakers.” On some Samsung models, there’s also a setting called “Multi-output Audio” tucked into the accessibility menu that enables simultaneous output. It exists for a real reason, but it’s not what you want here. Disable it, and the double audio goes away. CNET’s TV audio setup overview has additional context if the issue persists across different inputs.
A Few Things Worth Getting Right From the Start
Position the soundbar in front of or directly below the TV, not inside a closed cabinet. Enclosing it in cabinetry muffles the high frequencies and traps heat in the soundbar’s internals. If you’re wall-mounting, most soundbars include mounting hardware or work with universal mounts — just make sure it’s not sitting higher than the screen, which creates an odd disconnect between where dialogue appears visually and where it sounds like it’s coming from.
And don’t overlook the cable itself. A cheap HDMI cable will technically work for ARC. But for eARC with Atmos content, you genuinely need a cable rated HDMI 2.1 — “High Speed” or “Premium High Speed” labeled on the packaging. Using an older cable and wondering why Atmos isn’t working is a frustratingly common situation. Monoprice’s cable specification page is useful for understanding exactly what the labels mean before you buy.
The whole setup shouldn’t take more than fifteen minutes once you know what connects where and which settings to adjust. Most of the time people spend troubleshooting soundbars is time spent on problems that were created in the first five minutes.